标签归档:linux

怎么解决linux解压zip出现的乱码

在windows上压缩的文件,是以系统默认编码中文来压缩文件。由于zip文件中没有声明其编码,所以linux上的unzip一般以默认编码解压,中文文件名会出现乱码。
虽然2005年就有人把这报告为bug,但是info-zip的官方网站没有把自动识别编码列入计划,可能他们不认为这是个问题。Sun对java中存在N年的zip编码问题,采用了同样的处理方式。

有2种方式解决问题:

1、 通过unzip行命令解压,指定字符集

unzip -O CP936 xxx.zip //用GBK, GB18030也可以

有趣的是unzip的manual中并无这个选项的说明, unzip –help对这个参数有一行简单的说明。

2、 在环境变量中,指定unzip参数,总是以指定的字符集显示和解压文件
/etc/environment 中加入2行

UNZIP="-O CP936"
ZIPINFO="-O CP936"

或者使用 unar ,例如:

unar xxx.zip

使用 anyexec 在 linux 上运行.NET程序

这是一种不使用 mono-runtime 的特殊方法,ubuntu 控制台程序测试通过,理论上 linux 控制台程序都可以运行,但 GUI 未测试。

1、下载 anyexec(不支持32位)anyexec-1.2-linux_x64.tar
2、解压得到一个目录,改成自己想要的名字,例如叫:myanyexec
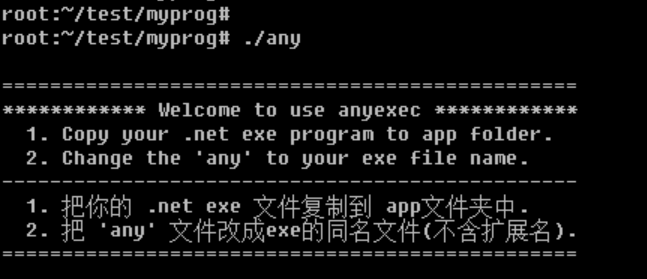
3、运行 myanyexec/any ,如果看到如下信息,说明 anyexec 能正常工作:

4、将编译好的 .net 程序整体移动到 myanyexec/app/ 目录下
5、将 myanyexec/any 改名为 .net 主程序名,注意不要含 .exe 后缀
6、运行改名后的最终程序,测试是否可以运行
7、压缩,交付!

继续阅读

linux 安装 mono 开发环境

1 Add the Mono repository to your system

The package repository hosts the packages you need, add it with the following commands.

Ubuntu 18.04

sudo apt-key adv --keyserver hkp://keyserver.ubuntu.com:80 --recv-keys 3FA7E0328081BFF6A14DA29AA6A19B38D3D831EF
echo "deb https://download.mono-project.com/repo/ubuntu stable-bionic main" | sudo tee /etc/apt/sources.list.d/mono-official-stable.list
sudo apt update

Ubuntu 16.04

sudo apt-key adv --keyserver hkp://keyserver.ubuntu.com:80 --recv-keys 3FA7E0328081BFF6A14DA29AA6A19B38D3D831EF
echo "deb http://download.mono-project.com/repo/ubuntu xenial main" | sudo tee /etc/apt/sources.list.d/mono-official.list
sudo apt-get update

继续阅读

ubuntu 中利用 docker 搭建 php + oracle 开发环境

利用 docker 部署 oracle 11g

安装 docker

拉取镜像

docker pull sath89/oracle-xe-11g

创建实例

docker run -d --restart always -p 8080:8080 -p 1521:1521 -v /etc/localtime:/etc/localtime:ro -v /my/oracle/data:/u01/app/oracle sath89/oracle-xe-11g

<!–more–>

时间同步的参数详见: <http://jerry.red/453/docker-容器与宿主机时间不同步的解决办法>

连接信息

Connect database with following setting:

hostname: localhost
port: 1521
sid: xe
username: system
password: oracle
Password for SYS & SYSTEM:
oracle

Connect to Oracle Application Express web management console with following settings:

http://localhost:8080/apex
workspace: INTERNAL
user: ADMIN
password: oracle

镜像详情:<https://hub.docker.com/r/sath89/oracle-xe-11g/>,利用 daocloud.io 可加速拉取镜像。


安装 Oracle Instant Client

Install RPMs

  1. Download the Oracle Instantclient RPM files from http://www.oracle.com/technetwork/database/features/instant-client/index-097480.html. Everyone needs either "Basic" or "Basic lite", and most users will want "SQL*Plus" and the "SDK".

  2. Convert these .rpm files into .deb packages and install using "alien" ("sudo apt-get install alien" if you don’t have it).

  3. For example, for version 12.1.0.2.0-1 for Linux x86_64 (64-bit):

alien -i oracle-instantclient12.1-basic-12.1.0.2.0-1.x86_64.rpm
alien -i oracle-instantclient12.1-sqlplus-12.1.0.2.0-1.x86_64.rpm
alien -i oracle-instantclient12.1-devel-12.1.0.2.0-1.x86_64.rpm
  1. Test your Instantclient install by using "sqlplus" or "sqlplus64" to connect to your database:
sqlplus system/oracle@//localhost:1521/xe

If you execute sqlplus and get "sqlplus: command not found", see the section below about adding the ORACLE_HOME variable.

If sqlplus complains of a missing libsqlplus.so file, follow the steps in the section "Integrate Oracle Libraries" below.

If sqlplus complains of a missing libaio.so.1 file, run

sudo apt-get install libaio1

or, if you’re installing the 32 bit instant client on 64 bit,

sudo apt-get install libaio1:i386

Integrate Oracle Libraries

If oracle applications, such as sqlplus, are complaining about missing libraries, you can add it to the system library list create a new file as follows:

sudo vi /etc/ld.so.conf.d/oracle.conf && sudo chmod o+r /etc/ld.so.conf.d/oracle.conf

and add the oracle library path as the first line. For example,

/usr/lib/oracle/12.1/client64/lib/

Then run ldconfig:

sudo ldconfig

ORACLE_HOME

Many Oracle database applications look for Oracle software in the location specified in the environment variable ‘ORACLE_HOME’.

Typical workstations will only have one Oracle install, and will want to define this variable in a system-wide location.

sudo vi /etc/profile.d/oracle.sh && sudo chmod o+r /etc/profile.d/oracle.sh

Add the following:

export ORACLE_HOME=/usr/lib/oracle/12.1/client64

Alternatively, each user can define this in their ~/.bash_profile

Note: From Ubuntu 11.04 (confirmed in 11.04 and 14.04) sqlplus was not recognized as a command unless the following line was also included in the oracle.sh file:

export PATH=$PATH:$ORACLE_HOME/bin

更多详情:<https://help.ubuntu.com/community/Oracle%20Instant%20Client>


安装 php 扩展

详见链接
linux下安装markdown编辑器Typora

# or run:
# sudo apt-key adv --keyserver keyserver.ubuntu.com --recv-keys BA300B7755AFCFAE
wget -qO - https://typora.io/linux/public-key.asc | sudo apt-key add -
# add Typora's repository
sudo add-apt-repository 'deb https://typora.io/linux ./'
sudo apt-get update
# install typora
sudo apt-get install typora

继续阅读

RAID5的配置方法

RAID有 0 1 10 5 6 等级别,RAID0 的性能很强,但是万一有一块盘坏了,整个阵列就废了,肯定不能用。RAID1 的安全性最好,读取速度也不错,但浪费空间,四块盘只相当于两块盘的空间。

RAID5 是这么个原理:交替在各个盘上写数据,这么看类似于RAID0,但是每写n-1个盘的数据,剩下的那个盘写的就不是数据,而是校验数据(parity)。这样一来,如果有一块盘坏掉,那么就可以用剩下的盘上的数据来恢复数据。即便你临时无法找到另一块盘来替换坏盘,阵列也能进入降级模式,重要的数据也可以直接读取备份出来。
继续阅读

Linux 和 Windows 双系统时间不一样的解决办法

这恐怕是所有装 Linux 和 Windows 双系统的人都会碰到的问题:Linux 系统的时间是对的,换到 Windows 系统,时间往往是早了上几个小时,那改吧,在线更新一下时间,改好了,再切换到 Linux 系统,结果时间是晚了几个小时,总之,Linux 和 Windows 总有一个时间是错的。

Windows 和 Linux 都把时间存在主板上的CMOS(保存计算机基本启动信息,如日期、时间、启动设置等),但这个“时间”的意义在它们的字典里不一样,讲个故事来说明,故事的主人公是上海的一台计算机,它的CMOS里存的时间是X年X月X日13时X分X秒X毫秒。

Windows 来了,它认为这个时间是当地时间,显示给用户看是X年X月X日13时X分X秒X毫秒,再根据用户设置的时区(上海是东8区),换算得到全球基准时间,即格林威治标准时间,得知全球基准时间为X年X月X日5时X分X秒X毫秒。

Linux 来了,它认为X年X月X日13时X分X秒X毫秒是全球基准时间,再根据用户设置的时区,换算得到当地时间是X年X月X日21时X分X秒X毫秒,于是它显示可用户看的就是21时。

知道原因了问题就好解决了,Windows 或 Linux 某一个系统改改适应对方就好了。这里给出让 Linux 认为时间是当地时间的办法。

执行 sudo timedatectl set-local-rtc true ,或在 /etc/adjtime 文件的末尾追加一行 LOCAL ,两个操作是等价的。之后重启,重新调整一下时间,万事大吉。

让 Windows 认为CMOS存的时间是世界基准时间也是可以的,方法不再赘述了。

Chrome 的 PAC 代理配置方法

Linux 下的 Shadowsocks-Qt5 只负责监听本地的一个端口,为连接上来的请求提供代理服务,而哪些应该走代理哪些该走正常渠道,并不做区分,所以只能靠上层应用来区分了,即哪些应该连到 Shadowsocks-Qt5 监听的端口哪些不连上去。

执行 man google-chrome ,找到了如下选项:

–proxy-pac-url=URL
Specify proxy autoconfiguration URL. Overrides any environment variables or settings picked via theoptions dialog.

先从网上找了个 PAC 文件,将设置 proxy 的那句改成 var proxy = "SOCKS5 127.0.0.1:1080;";,我的 Shadowsocks-Qt5 监听的是 127.0.0.1:1080,协议是 SOCKS5。再把这个 PAC 文件存到固定一个位置,比如我存在了 /home/wolfogre/Documents/autoproxy.pac,然后再命令行里执行:/usr/bin/google-chrome-stable %U --proxy-pac-url=file:///home/wolfogre/Documents/autoproxy.pac,Chrome 打开了,已经可以开心地上 Google 了,而访问一般的网站也没有走代理。

问题来了,每一次打开 Google 都要敲这么长的命令简直反人类,我还是希望通过点菜单里的漂亮图标启动。菜单里的所有图标启动项其实都是 /usr/share/applications 里的 *.desktop 文件,关于这一点下一节会在做说明,现在要做的就是以管理员身份编辑google-chrome.desktop ,在里面每一句 Exec=/×××× (应该有三句,分别针对普通打开,新疆窗口,佚名打开)的行末追加 --proxy-pac-url=file:///home/wolfogre/Documents/autoproxy.pac

这时候打开 Chrome 就能开心地上 Google 了。

Network Manager显示设备未托管的解决办法

Linux里面有两套管理网络连接的方案:

1、/etc/network/interfaces(/etc/init.d/networking)

2、Network-Manager

两套方案是冲突的,不能同时共存。

第一个方案适用于没有X的环境,如:服务器;或者那些完全不需要改动连接的场合。

第二套方案使用于有桌面的环境,特别是笔记本,搬来搬去,网络连接情况随时会变的。

他们两个为了避免冲突,又能共享配置,就有了下面的解决方案:

1、当Network-Manager发现/etc/network/interfaces被改动的时候,则关闭自己(显示为未托管),除非managed设置成真。

2、当managed设置成真时,/etc/network/interfaces,则不生效。

Ubuntu 安装 Sublime Text 3

最新版 3.2 build 3200 已经解决了中文输入问题,正常安装即可。

安装

Install the GPG key:

wget -qO - https://download.sublimetext.com/sublimehq-pub.gpg | sudo apt-key add -

Ensure apt is set up to work with https sources:

sudo apt-get install apt-transport-https

Select the channel to use:

  • Stable

    echo "deb https://download.sublimetext.com/ apt/stable/" | sudo tee /etc/apt/sources.list.d/sublime-text.list

  • Dev

    echo "deb https://download.sublimetext.com/ apt/dev/" | sudo tee /etc/apt/sources.list.d/sublime-text.list

Update apt sources and install Sublime Text

sudo apt-get update
sudo apt-get install sublime-text sublime-merge

安装插件

插件来源:https://packagecontrol.io/installation

  1. Click the Preferences > Browse Packages… menu
  2. Browse up a folder and then into the Installed Packages folder
  3. Download Package Control.sublime-package and copy it into the Installed Packages directory
  4. Restart Sublime Text

配置代理

由于网站背墙,插件无法安装,此时需要配置一下 http proxy。

打开 Preferences > Package Settings > Package Control > Settings - User 菜单

编辑 Package Control.sublime-settings,添加两行:

// 改为真实IP和端口
"http_proxy": "http://127.0.0.1:8123",
"https_proxy": "http://127.0.0.1:8123"